
Western North Carolina is an outdoor enthusiasts paradise. Gorgeous views, rugged terrain, and temperate weather make it ideal for a variety of outdoor pursuits, including backpacking. However, nothing ruins an adventure as quickly as an ill-fitting pack.
A poor fitting pack can lead to a host of issues ranging from slight inconveniences to serious back issues. Such problems as back injuries, chafing, and instability, can be avoided simply by having a pack that fits you properly.
While the best way to get a properly fitting pack, is to have a professional fit you in store, there are scores of reasons to know how to fit your own pack. For instance, weight gain/loss can require tweaks to make your existing pack fit properly, and if you keep a spare set of gear to take less knowledgeable friends out, knowing how to get them the best possible fit is is a huge help. Really, knowing how to fit your own pack is an essential skill for any outdoor explorer.
Getting Started
The process of getting a perfect fit can be broken down into three basic steps:
- Get your measurements
- Personalize your fit
- Check and adjust your fit
Measure
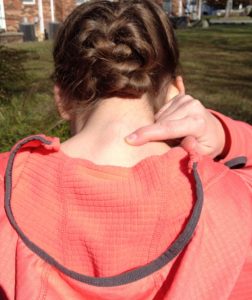
1. Find Your Iliac Crest:

This is the point at the top of your hip bone. An easy way to find it is to point to your belly button and draw a line outwards to your hips.
This is the point where your hip belt will sit and from which you will measure torso length.
2. Measure Your Torso:
If you stop by the store, we have a special tool that you can put on like a backpack that will determine your frame size easily.
If you are measuring at home, you can easily measure torso size with the help of a friend and a soft measuring tape.
a. Tracing your finger from your iliac crests toward your spine, find where they align horizontally.
b. Standing up straight, place your chin down toward your chest. At the base of your neck, one vertebra should feel particularly prominent; this is your C7 vertebra.
c. Have a friend measure the distance between these two points, using a soft measuring tape.

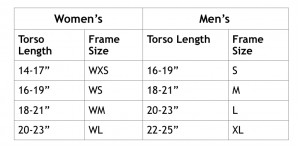
d. Determine your base size based on the chart below.
e. Determine Your Hipbelt Size:
Hipbelt fit is very personal and depends on more factors than simple measurements. A good rule of thumb, when choosing hipbelt size, is to start with your typical pant size.
For instance, a woman who is a 4-6 would start with a size small hipbelt, and a man who is a 34-36 would start with a large hipbelt.
Personalize Your Fit
Now that you have your base measurements, it’s time to pick a pack and dial in a personalized fit. It should be noted that the measurements you’ve taken should be a starting point. You will likely have to adjust sizing as you try packs on. This is especially true if your measurements fall at the small or large end of your size range.
1. Size the Shoulder Straps:
Begin by loosening the shoulder straps from the Velcro panel holding them to the frame. Adjust the straps according to where your measurements fall on the size chart. For instance, if you are in the middle of a size range, make sure that the shoulder straps are placed roughly in the middle, etc.
2. Loosen All Straps:
Make sure that your hipbelt, shoulder straps, sternum strap, and load lifters are all as loose as they will go.
3. Put On the Pack
4. Adjust Your Hipbelt:
Hold up your pack so that the hipbelt sits squarely on your iliac crest, and tighten the hipbelt adjustment straps. Pull forward evenly on both straps to ensure an even and comfortable fit.
The fit should be snug, but not tight.
5. Adjust Your Shoulder Straps:
Pull down and back on both shoulder adjustment straps to tighten. The shoulder straps should sit snugly, but comfortably, on top of your shoulders.
6. Adjust Your Load Lifters:
These are the small webbing straps that run from the body of your pack to your shoulder harness.
Pull down on them gently till they are taught and you feel the pack resting close to your back. Typically they should be at a 45-60 degree angle.
7. Tighten Your Sternum Strap:
Make sure that your sternum strap is sitting in line with your breastbone. Tighten it slightly so that it’s keeping your shoulder straps in place.
Check and Adjust Your Fit
Now that you have your pack set up, double check your fit. Load up your pack with your gear or add 20-30 pounds of weight to get an idea of the weighted fit. Loosen up all your straps and put the pack back on as outlined above. Stand in front of a mirror or get a knowledgeable friend to help.
1. Check Your Hipbelt:
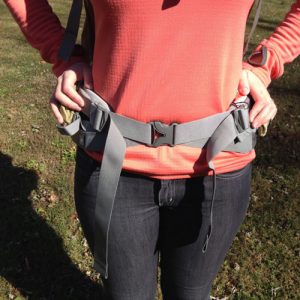
A properly fitting hipbelt
Make sure that your hipbelt is sitting squarely on your iliac crest. You should feel like your hips are carrying about 80% of the weight in your pack.
If you feel like your hips are carrying less than that, your hipbelt is likely sitting too low. Adjust it slightly higher.
Your hipbelt should curve comfortably around your hip bones, and you should have 3-6” of space between the pads on your hipbelt.
If you have much more room than this, you should swap your hipbelt out for a larger size. If you have much less than this, you should swap out your hipbelt for a smaller size.
2. Check your shoulder straps:

Properly Fitting Shoulder Straps
Your shoulders should feel as if they are supporting about 20% of your weight, if you feel that they are supporting much more than this, take a second look at your hipbelt.
Shoulder straps should curve up around your shoulder blades. The base of the strap should start around 2” below the top of your shoulder.
If the straps do not appear to be resting on your shoulder, you may need to readjust your shoulder harness to sit lower on the frame. If this does not fix the problem, you should start over with a smaller frame size.
The front end of the shoulder strap should sit about halfway down your rib cage. If the strap ends much higher than this, or if it is cutting into your shoulder, you may need to readjust your shoulder harness to sit higher on the frame. If this does not fix the problem, you should start over with a larger frame size.
3. Check Your Load Lifters:
The top of your pack should sit close to your back, and you should not feel like your pack weight is pulling you backward. If you have either of these problems, you should tighten your load lifters.
You should be able to move your head, and should not feel like your pack forces you to bend your neck forward. You should not feel any pressure pulling up on your shoulder straps. If you have any of these problems, you should loosen your load lifters.
4. Check Your Sternum Strap:

A properly fitting sternum strap
Your sternum strap should sit on your breastbone. It should be just tight enough to keep your shoulder straps in place.
If your sternum strap is pulling your shoulder straps in or restricting your breathing, it needs to be loosened.
Enjoy Your New Pack
You should now have a pack that fits you well. Keep in mind that beyond these steps, pack fitting is largely personal preference. Taking the time to try on a variety of packs during the selection process and following these recommended fitting steps, will give you the best fit possible. Happy trails!
